There is something so magical and exciting about opening up a new fantasy book and seeing a map at the beginning. For me, that’s an excellent sign that it’s something I’m really going to dig. Before the book even begins, I’m already feeling like I’m stepping into another world.
Like me, you may have seen the viral TikToks of people creating fantasy maps using rice. I was immediately intrigued by the idea, especially as someone currently writing my own fantasy novel. I have really struggled to visualize the map in my head, and some digital or web-based map creators can seem a little overwhelming or impersonal to me.
Though I was a little skeptical, I was already looking for a new cozy craft for a rainy afternoon, so I decided to give it a go.
Affiliate Link Disclosure
This post may contain affiliate links. This means I may earn a small commission if you choose to purchase through my links, at no extra cost to you. I only share products I genuinely love or think you’ll enjoy.
Supplies You’ll Need
- Paper (I used mixed-media paper)
- Tea Bag (to give the map that antique feel)
- Rice
- Pencil
- Black Pen(s) or Markers (I used these in three sizes!)
- Eraser
- Ruler (Optional)
Expert-Level Upgraded Supplies
- Colored Pencils (Optional)
- Watercolor Paints (Optional)
- Metallic Pens (Optional)
- Parchment-Style Paper (Optional)
Step-By-Step: Creating a Fantasy Map with Rice
Step 1: Use a tea bag to “age” the paper.

I did this step first to give my paper a nice antique look. I just made tea normally and then rubbed the tea bag all over the paper. I found that it looked better when I didn’t do it uniformly. The imperfections really made it look more like old parchment.
Then, you can either let it dry, or (if you’re super impatient like me) use a hair dryer to speed up the process.
Step 2: Trace Around the Rice
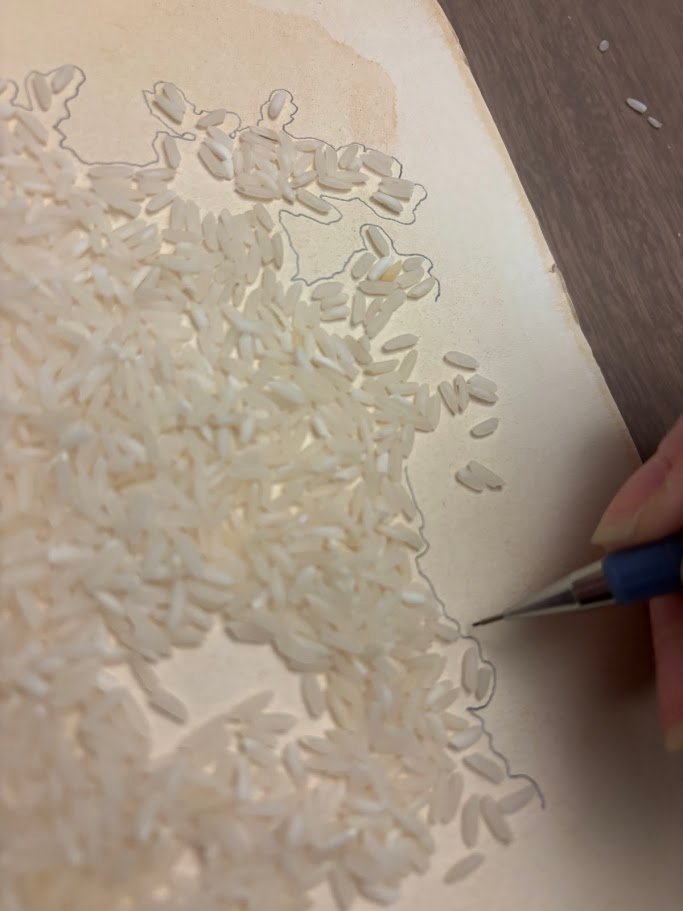
Once my paper was completely dry, I dumped the rice on the page completely randomly. I wasn’t sure exactly how much rice to use, but I ended up using about ⅓ of a cup for my 8 x 10 (ish) size paper. I probably could have used a lot less, but it really doesn’t matter.
Then, I took a pencil and slowly traced around the edges of the rice. The goal is to create a realistic landmass, so the more imperfections, the better. I think that the weirdest shapes make the most interesting maps, so try not to have any straight or smooth lines if possible.
Step 3: Use Your Pen to Refine the Coast
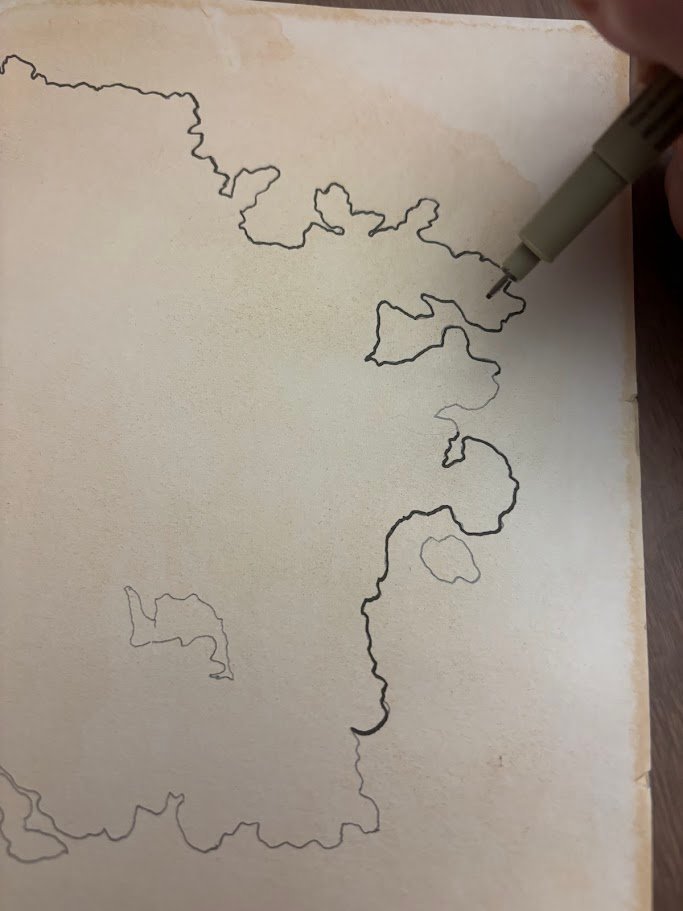
Then, I went back with my small pen (I used a size 3) and traced over my coastline. I actually went back a second time (with my size 1 pen) to add some dimension, though this is totally optional. Make sure that you’re adding small bays, creating islands, and connecting any sections you’d like.
Step 4: Add Geographic Features

Next, I added mountain ranges, rivers, forests, lakes, swamps, and other geographic features. I got really into this, and I had a really fun time. Admittedly, I spent way more time doing this than was probably necessary, but I have no regrets.
Step 5: Name Your Locations
Next, go in and give your locations creative names like the Moonfall Mountains or Sinister Swamp. These maybe aren’t the most original or inspiring examples, but you get the idea. Be as creative as possible!
I’m a little bit of a perfectionist, so I am still working on this step. As I mentioned, I’m planning to use this map as inspo for the novel I’m currently working on, so I want it to be perfect!
Step 6 (Optional): Add Some Color
This part is totally optional, but you can go in and add some color with watercolor or colored pencils if you so choose. I decided to skip the color this time, but I plan to go back and use a metallic pen to add a fun compass to the corner.
Other Ways to Personalize Your Map
I didn’t do this for this map, but I think it would be really cool to do different themes for different maps. For example, you could do a Cottagecore-themed map where you added flower illustrations and herbal elements, or you could try a Dark Academia-themed map with books and Latin-inspired names. There are an infinite number of ways you can create and customize your map, which is one of the really fun parts of this project!
Final Thoughts

I got really, really into this project. I had so much fun at every step. It required a minimal number of supplies, all of which I had lying around my house, so it was very inexpensive.
I did struggle initially because I’m a little bit of a perfectionist (and not very experienced with drawing). I had to remind myself frequently that the imperfections are what make the map realistic and unique, and my ability to draw well is in no way related to how creative or fun this project can be. Once I threw that desire for perfection out of the window, I was unstoppable!
I had so much fun with this project that I am already planning the theme for my next map. So, if you’re interested in this project, I would encourage you to give it a go! And be messy and embrace those imperfections; that’s what makes it unique!